
Unit Planning in Technology: Cell Phone / iPod Holder
Learning Sequence
Lesson 1
|
Lesson Sequence |
Resources |
Learning Intentions |
Introduction into Course
|
||
| Codes of Practice Safety in the Environment of Practice
|
Students:
|
|
Introduce Technology Cycle
|
Student module booklet
|
Students can:
|
Skills Development
The teacher demonstrates use of tools, ie use of rulers, measuring, metric system and how to measure a rectangle 65mmx35mm onto a piece of card. Draw two rectangles then demonstrate how to draw a random design and a symmetrical design. Cut out the shapes. Students choose 2 pieces of acrylic and the teacher glues them together. The students then mark out their shape onto one of the surfaces of the acrylic. The teacher then explains and demonstrates why we drill the hole for the split ring first, before cutting out the shape. (explain why waste wood is placed behind the acrylic when drilling the hole. The students then proceed to drill the hole. |
Student Booklet Instruction sheet Knowledge and understanding Workshop facilities Hand tools Card |
|
Lessons 2 – 3
|
Lesson Sequence |
Resources |
Learning Intentions |
| Students go to assigned benches and the roll is called. | ||
| The teacher then recaps the last lesson. Then introduces the hand tools and machine tools that are appropriate to cut out the shape for the Key tag / Skate Bd. The coping saw and scroll saw, the teacher then demonstrates the use of both tools as a method of cutting out the shapes keeping to the waste side of the line. Codes of practice, i.e. safety in practice with the use of tools and machines. Correct working procedures to gain desired outcome. Once the shape is cut out the teacher demonstrate how to file down to the line using a range of files
Demonstrate how to round the edge using the fine file. The teacher then demonstrates how to sand the edges smooth using three grades of paper progressively getting the edges smoother.
The teacher then demonstrates how to polish the edges using Jif™ and a rag. |
Students:
|
|
|
Refer to the Class Brief
Ask the students to choose a Key stakeholder – someone to design the cell phone/ipod for (usually a family member) |
Student module booklet
|
Students:
|
Lessons 3 – 7 or (4 – 7)
|
Lesson Sequence |
Resources |
Learning Intentions |
| Technology Cycle | ||
| Introduction to issue;
Revise the technology cycle. Introduce the issue that cell phone/ipods/mp 3 players are often left lying around and can get lost. Introduce class brief and discuss possible attributes/specifications as related to the properties of plastic. Reflect on Key Stakeholder and what the holder might be designed for. |
Tech. cycle flow chart.
Examples of required stationary. Year 9 teachers handbook |
Students understand the aims of the course and how graphics is an integral part of technology.
Students understand the stages of the technology cycle |
| Talk about Restrictions and the importance of Planning.
Talk about the Key stages and the time available ( 6 sessions) What resources are needed at the different stages during the project? With teacher guidance draw this on the worksheet headed "Planning”. Complete the first page in their brief (this can be completed for homework if not done in class)
|
Worksheets. | Students will develop an understanding of planning and see the importance of this in completing their outcome. Students will understand what resources are needed to work through the process.
Develop an understanding of the stakeholders needs. |
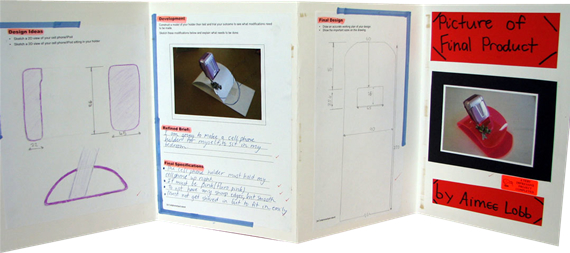
| Concepts: Use ideas from stakeholder information to develop potential holder ideas.
Teach students about 2D sketches and the use of Design ideas. Use the work sheet. Draw concepts that meet stakeholder interests. Apply annotations to support ideas. (Use a cardboard mockup of the phone ipod and glue this onto the concept drawing.) Take drawings of design ideas to stakeholder for feedback to help selection of an idea for further development. Refine the brief as appropriate. |
Worksheet
Drawing equipment. Colouring pencils |
Understand and apply 2D sketching skills to visually communicate their design ideas |
| Mock Up: Make a mockup of the holder. Use mock-up to test the design idea and to make modifications to the product. (scale 1:1)
Photograph the mockup with the cell phone / ipod in place to identify changes. Make modifications to the mockup, test again and use this to communicate the developed concept to your stakeholder. Development: Apply the feedback given to you by the stakeholder. Make any adjustments requested and show this on the photograph pasted on the development page. Refine brief as appropriate – support changes/modifications with annotations. |
Drawing equipment.
Card, scissors, rulers 3mm mdf Scrollsaws Worksheets. |
Learn how to cut and fold card. Learn to use scrollsaws and coping saws.
Understand the importance of using a mock-up as a form of testing and trialling. |
| Refined brief: Create a final written statement that tells you who the electronic device holder is for, what it is holding and where the holder will be placed. | Worksheet | Understand the importance of a final brief
and performance specifications |
| Refined Specifications: Make a list of the refined performance specifications for your holder. | Worksheets. | |
|
Working drawing: Teach 2D drawings – Draw an elevation of the development and show how to apply correct dimensions and ensure accuracy. Evaluate working drawing against the brief. Make any further modifications based on evaluation. |
Formal drawing and dimensions. |
Students will understand the importance of accuracy to create a quality outcome.
|
Manufacturing
|
Continuum of skills development learnt previously.
|
Apply relevant knowledge and skills to manufacture an outcome |
Plastics Theory (Homework)
|
|
Students can:
|
Lesson 8
|
Lesson Sequence |
Resources |
Learning Intentions |
Portfolio presentation and Evaluation:-
|
Evaluation sheet.
Assessment Rubric |
|
|
Portfolio card, craft knifes and cutting mats. |
Students can:
|
Student's presentation of the unit