
Delivery
'Creative Interiors' was introduced in 2005 and repeated, with some slight modifications, this year. The course is delivered in two parts. The first unit - "The Mirror" - is a one term unit, aimed at encouraging students into the workshop and using tools as soon as possible. Doug says this is aimed at getting the course off to a fast start and capturing and maintaining the students' enthusiasm and energy. It also aims at increasing their accuracy, craft skills and quality of outcome while introducing basic technological terms.
The unit teaches the pupils to think about someone other than themselves, by introducing them to the stakeholder concept. They are asked to design and build a wall mirror for someone they know. Furthermore, mirrors must be designed to be hung or otherwise located in a specific place. Students are encouraged to appreciate the idea of quality; of building something that lasts and serves its purpose well. In strictly practical terms, the unit is aimed at skill development and introduces concepts such as face and edge marks and the correct use of tools and equipment.
Doug suggests that the introduction of technology and the abandonment of 'old-fashioned' woodworking skills has been a mixed blessing and may have something to do with the evident lack of practical skills shown, at least initially, by the students. It may well be that social factors play a part as well. During the mirror unit and the Creative Interior unit, Doug went out of his way to identify and demonstrate the skills the students lack, either by one-on-one demonstrations or group/class demonstrations.
While Doug says the mirror unit was designed to be an easy introduction to the course, he insists that nothing but good quality work leaves the workshop. (Or merely adequate as the case may occasionally demand.)
"Some things had to be redone."
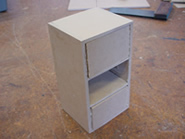
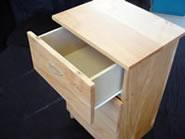
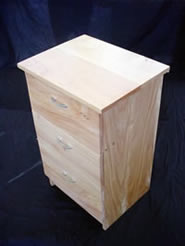
The second unit involves students designing and building an Interior item, such as a storage unit or a table. Again, a key stakeholder is targeted. A major focus of the unit is functional modelling. After an initial concept has been decided on it's off to the workshop to make quarter size models from 6mm MDF. Doug credits the idea of using modelling to engage his students to professional support facilitator Cliff Harwood.
Functional modelling serves a number of purposes. Besides using the models for testing and trialling, it gets the students into the workshop and making things quickly and captures their enthusiasm. It helps create a good working atmosphere, Doug says.
"Kids really enjoy it. They are really into it."
Modelling improves the quality of the outcome in terms of fitness for purpose of the finished product. Unlike sketches or formal drawings, models can be turned over in the hand and a design can be easily examined from any angle. Functional modelling frees the students up and allows their intuition to come into play. Issues of functionality (and buildability) can be considered. Joints can be experimented with to test their suitability. Models also allow the aesthetics of a project to be easily assessed by the student and the stakeholder.
Functional modelling has a long history in technological practice. While the advent of computers has made inroads into the place of 3D modelling, modelling is still very much part of contemporary design practice. That this is so, was illustrated when Doug and his class visited local furniture designer/maker Peter Maclean. Based in Clive, Peter Maclean designs and makes furniture on commission; he uses modelling to test design concepts on clients before committing to the use of expensive materials.
As the models are created, design flaws become apparent. The modelmaking became an exercise in problem solving. Changes to the models are recorded with photos, sketches and sentences. Initially documentation doesn't come easily but Doug says students get better at it as time goes by. Doug makes a lot of use of his digital camera. As a model is modified, the changes are recorded by a series of 'before-and-after' shots. Students are given print-outs, which are kept in the workbook. The photographs are the seed around which the rest of the documentation grows. Each set of photographs is accompanied by a series of explanatory sketches, and short paragraphs, detailing the changes made. Doug says providing a clear format eases the documentation process. Besides aiming to get the students to take home something they can be proud of, the process aims to get them to achieve in terms of absorbing the way technology is done.
"In the past getting the students to do development sketches was difficult and I struggled to get the kids to do anything on paper. Cliff happened to be in the school and he suggested modelling as a form of planning."
Models are created quarter size. This scale was chosen to make things as easy as possible. 'Real life' dimensions need only be halved and halved again to find measurements for a model. Scaling-up to life size is easier still. The 6mm MDF used to create the models becomes 18mm, a standard and easily procurable sheet thickness. Dimensions, taken from the model, are drawn directly on the full-size building material.
"That's really my whole focus at this level. If the students can follow the process then they should be able to achieve without a lot of unnecessary struggle."
In the first year the course was offered, Doug provided the context of creative interiors and left the choice of project to the students and stakeholders. Projects included a pool cue holder, a gun rack, and a sidetable capable of holding 24 cans of beer. This year, constraints on storage space saw Doug limit the size of the projects to less than 'coffee table size'.
To allow enough classroom time to complete the documentation, Doug and the students nominate a Saturday towards the end of the course on which everybody gathers in the workshop to complete their projects.